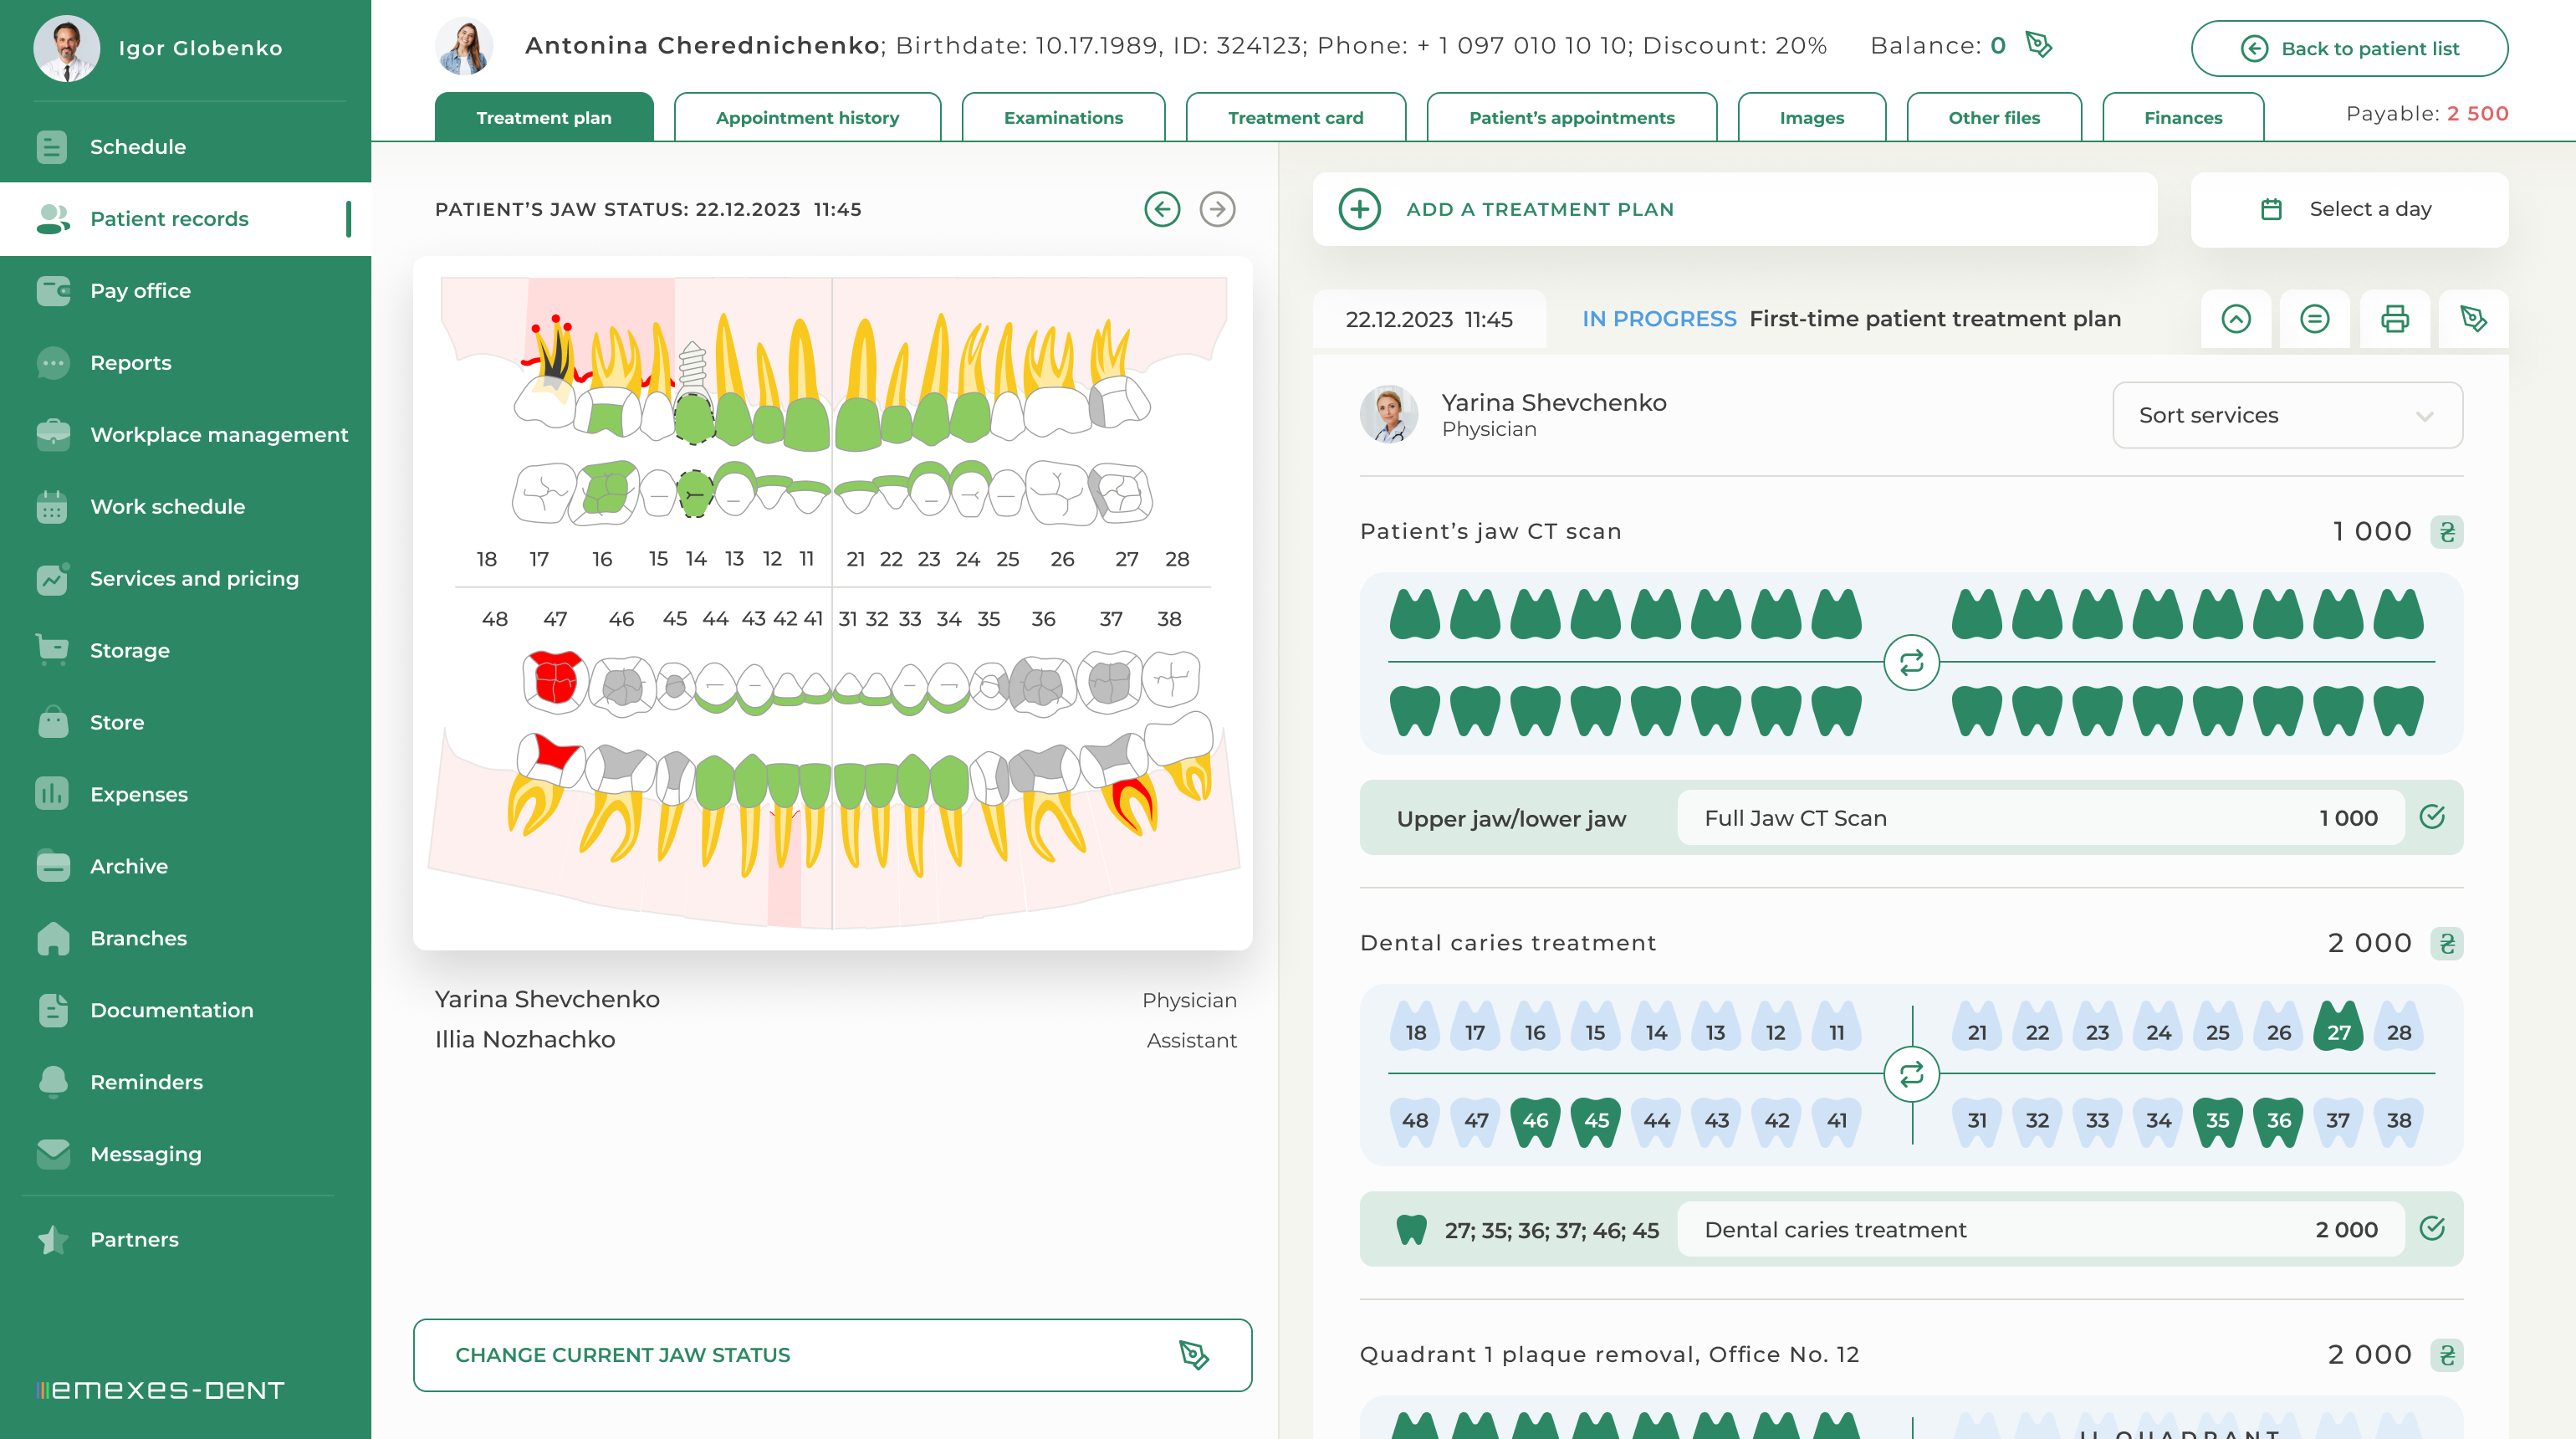
After you go to the patient’s record, you can see all its sections at the top of the page. There is also a "Back to patient list" button that allows you to go back. Below you can see the first tab "Treatment Plan" on the left, which includes: the current jaw status on the left and previously created treatment plans of the patient on the right. To search for an already created plan in the specific time period, you can use the "Select date" button.
TREATMENT PLANS CREATED are displayed minimized by default, but they can be opened for detailed viewing, if necessary, to see the cost of procedures included in them and to print them. The ability to edit a treatment plan depends on whether a specialist was included in the list of doctors and assistants when the plan was created. Treatment plan creation is usually handled by doctors or an assistant.
"Add treatment plan" is a button that is always located above the list of existing treatment plans. After clicking it, you specify the following information in the modal window:
1. The DOCTOR who manages the treatment plan and the doctors who will be involved in the treatment.
2. ASSISTANT, if the doctor needs them. You can also specify assistants involved in the treatment.
3. A BRIEF DESCRIPTION of the treatment plan, which will serve as the title.
Dentists and Assistants specified in the modal window have access to edit the treatment plan and can also remove it. Therefore, if a doctor wants to allow another specialist to edit the treatment plan, they must be specified in the treatment plan modal window. After you click the "Save" button, a pop-up window of the new treatment plan will appear, which you can minimize to view any other information in the system.
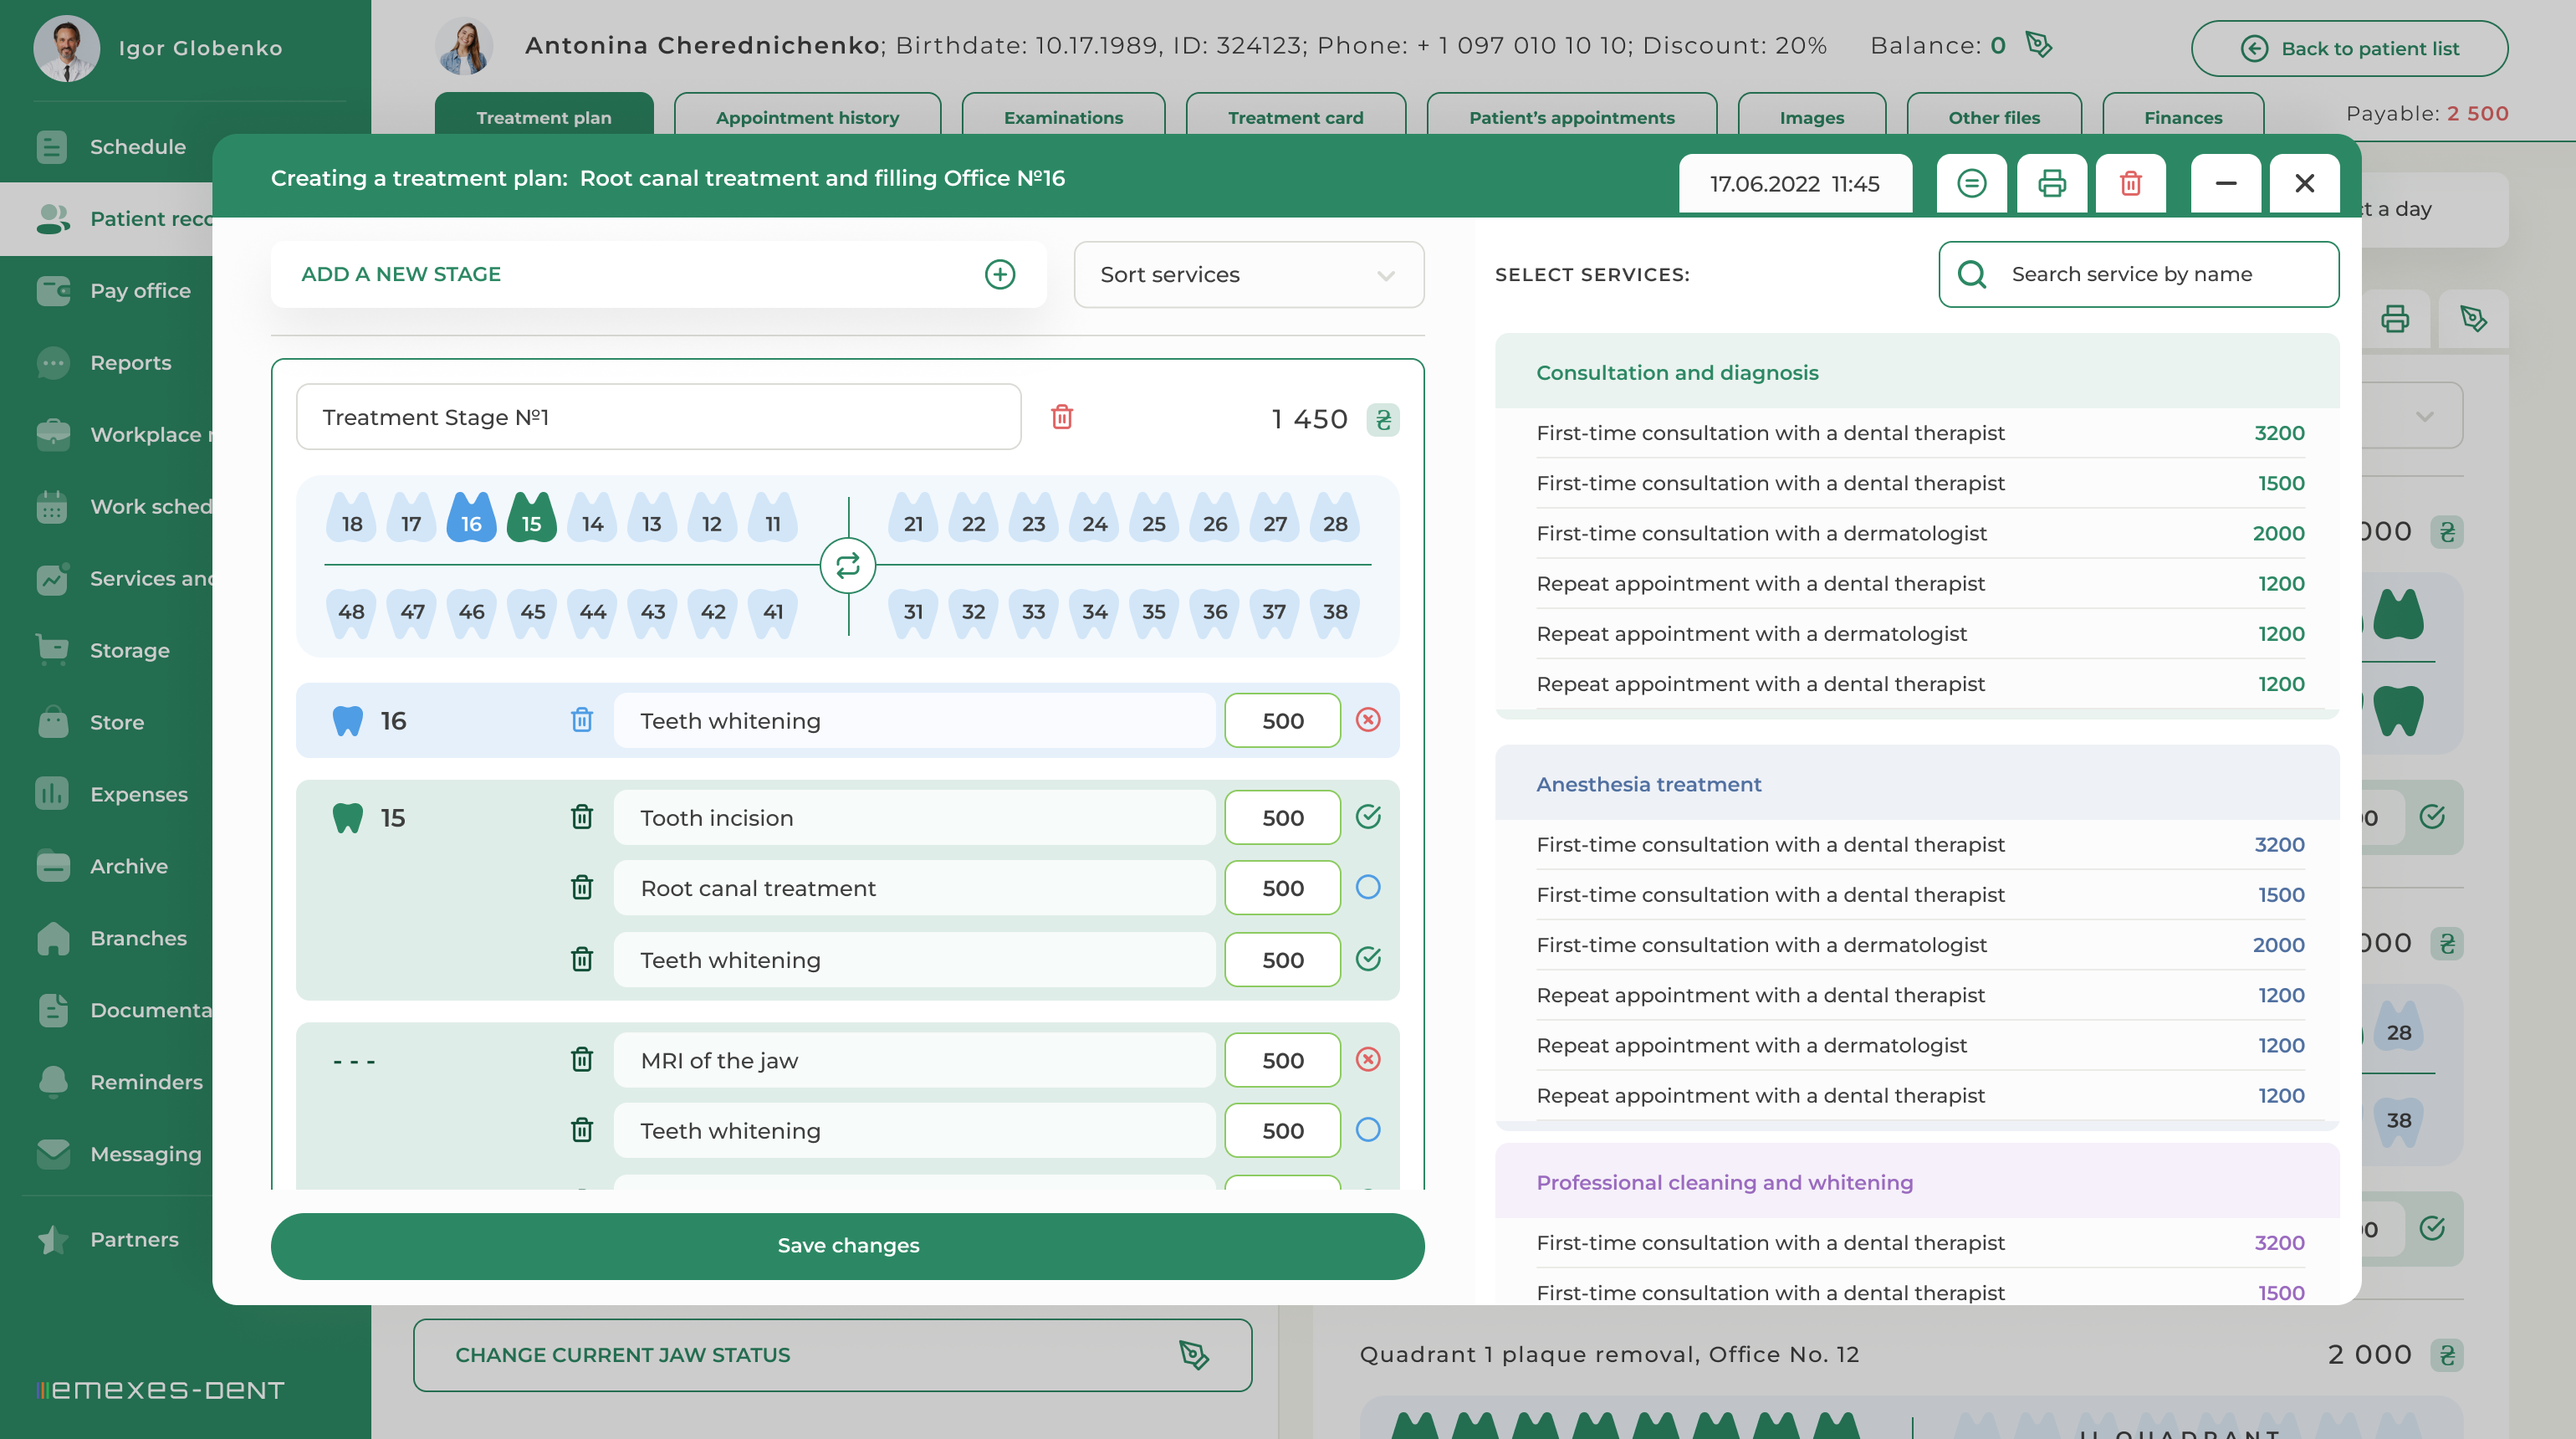
On the left side of the window, you can see the dental grid, with the option to select the jaw display format:
1. Teeth individually
2. Jaw quadrants
3. Upper and lower jaw
4. Jaw segments
5. Child jaw (deciduous teeth)
The available procedures are displayed on the right. You can assign scheduled procedures for an individual tooth, jaw, quadrant, segment, or for several teeth at once, or you can assign them for the entire stage as a general service without being bound to a location. A treatment plan may consist of a single step or multiple steps. Each stage can be given its own name. To add a new stage, click the button of the same name at the top of the pop-up window. Any stage, if necessary, can be removed from the treatment plan.
TREATMENT PLAN CREATION starts by adding a NEW STAGE to it, after which the list of services that can be assigned to the stage is activated on the right. After you select a service on the right, it will be added to the current stage on the left. If no object is selected in the dental grid, the service will not be linked to a specific location.
In order to schedule a procedure for an individual tooth or jaw object, you must first select the object and then click on the desired procedure in the list on the right. After that, the same object selected in the grid will show up in an abbreviated form in the line with the scheduled service on the left. To assign a procedure to several grid objects at once, you can use the Ctrl + Shift key combination. Using the same method, several procedures can be assigned to one object, if necessary.
When adding stages and services, they are automatically saved in the already created treatment plan. In the same window, you get the option to hide prices formed based on added procedures and the option to print out the file.
After you create a plan, it will be displayed in the general list on the right. Here, you can view the treatment plan and change the status of scheduled procedures, which by default are added here with the status "Not completed". As the patient is treated, doctors and assistants included in the treatment plan can change the status of scheduled procedures to "Done" or "Scheduled for another day".
To change the status of a service in a stage, you should left-click on it and the status menu will open. This action is available both when viewing the treatment plan and when editing it.
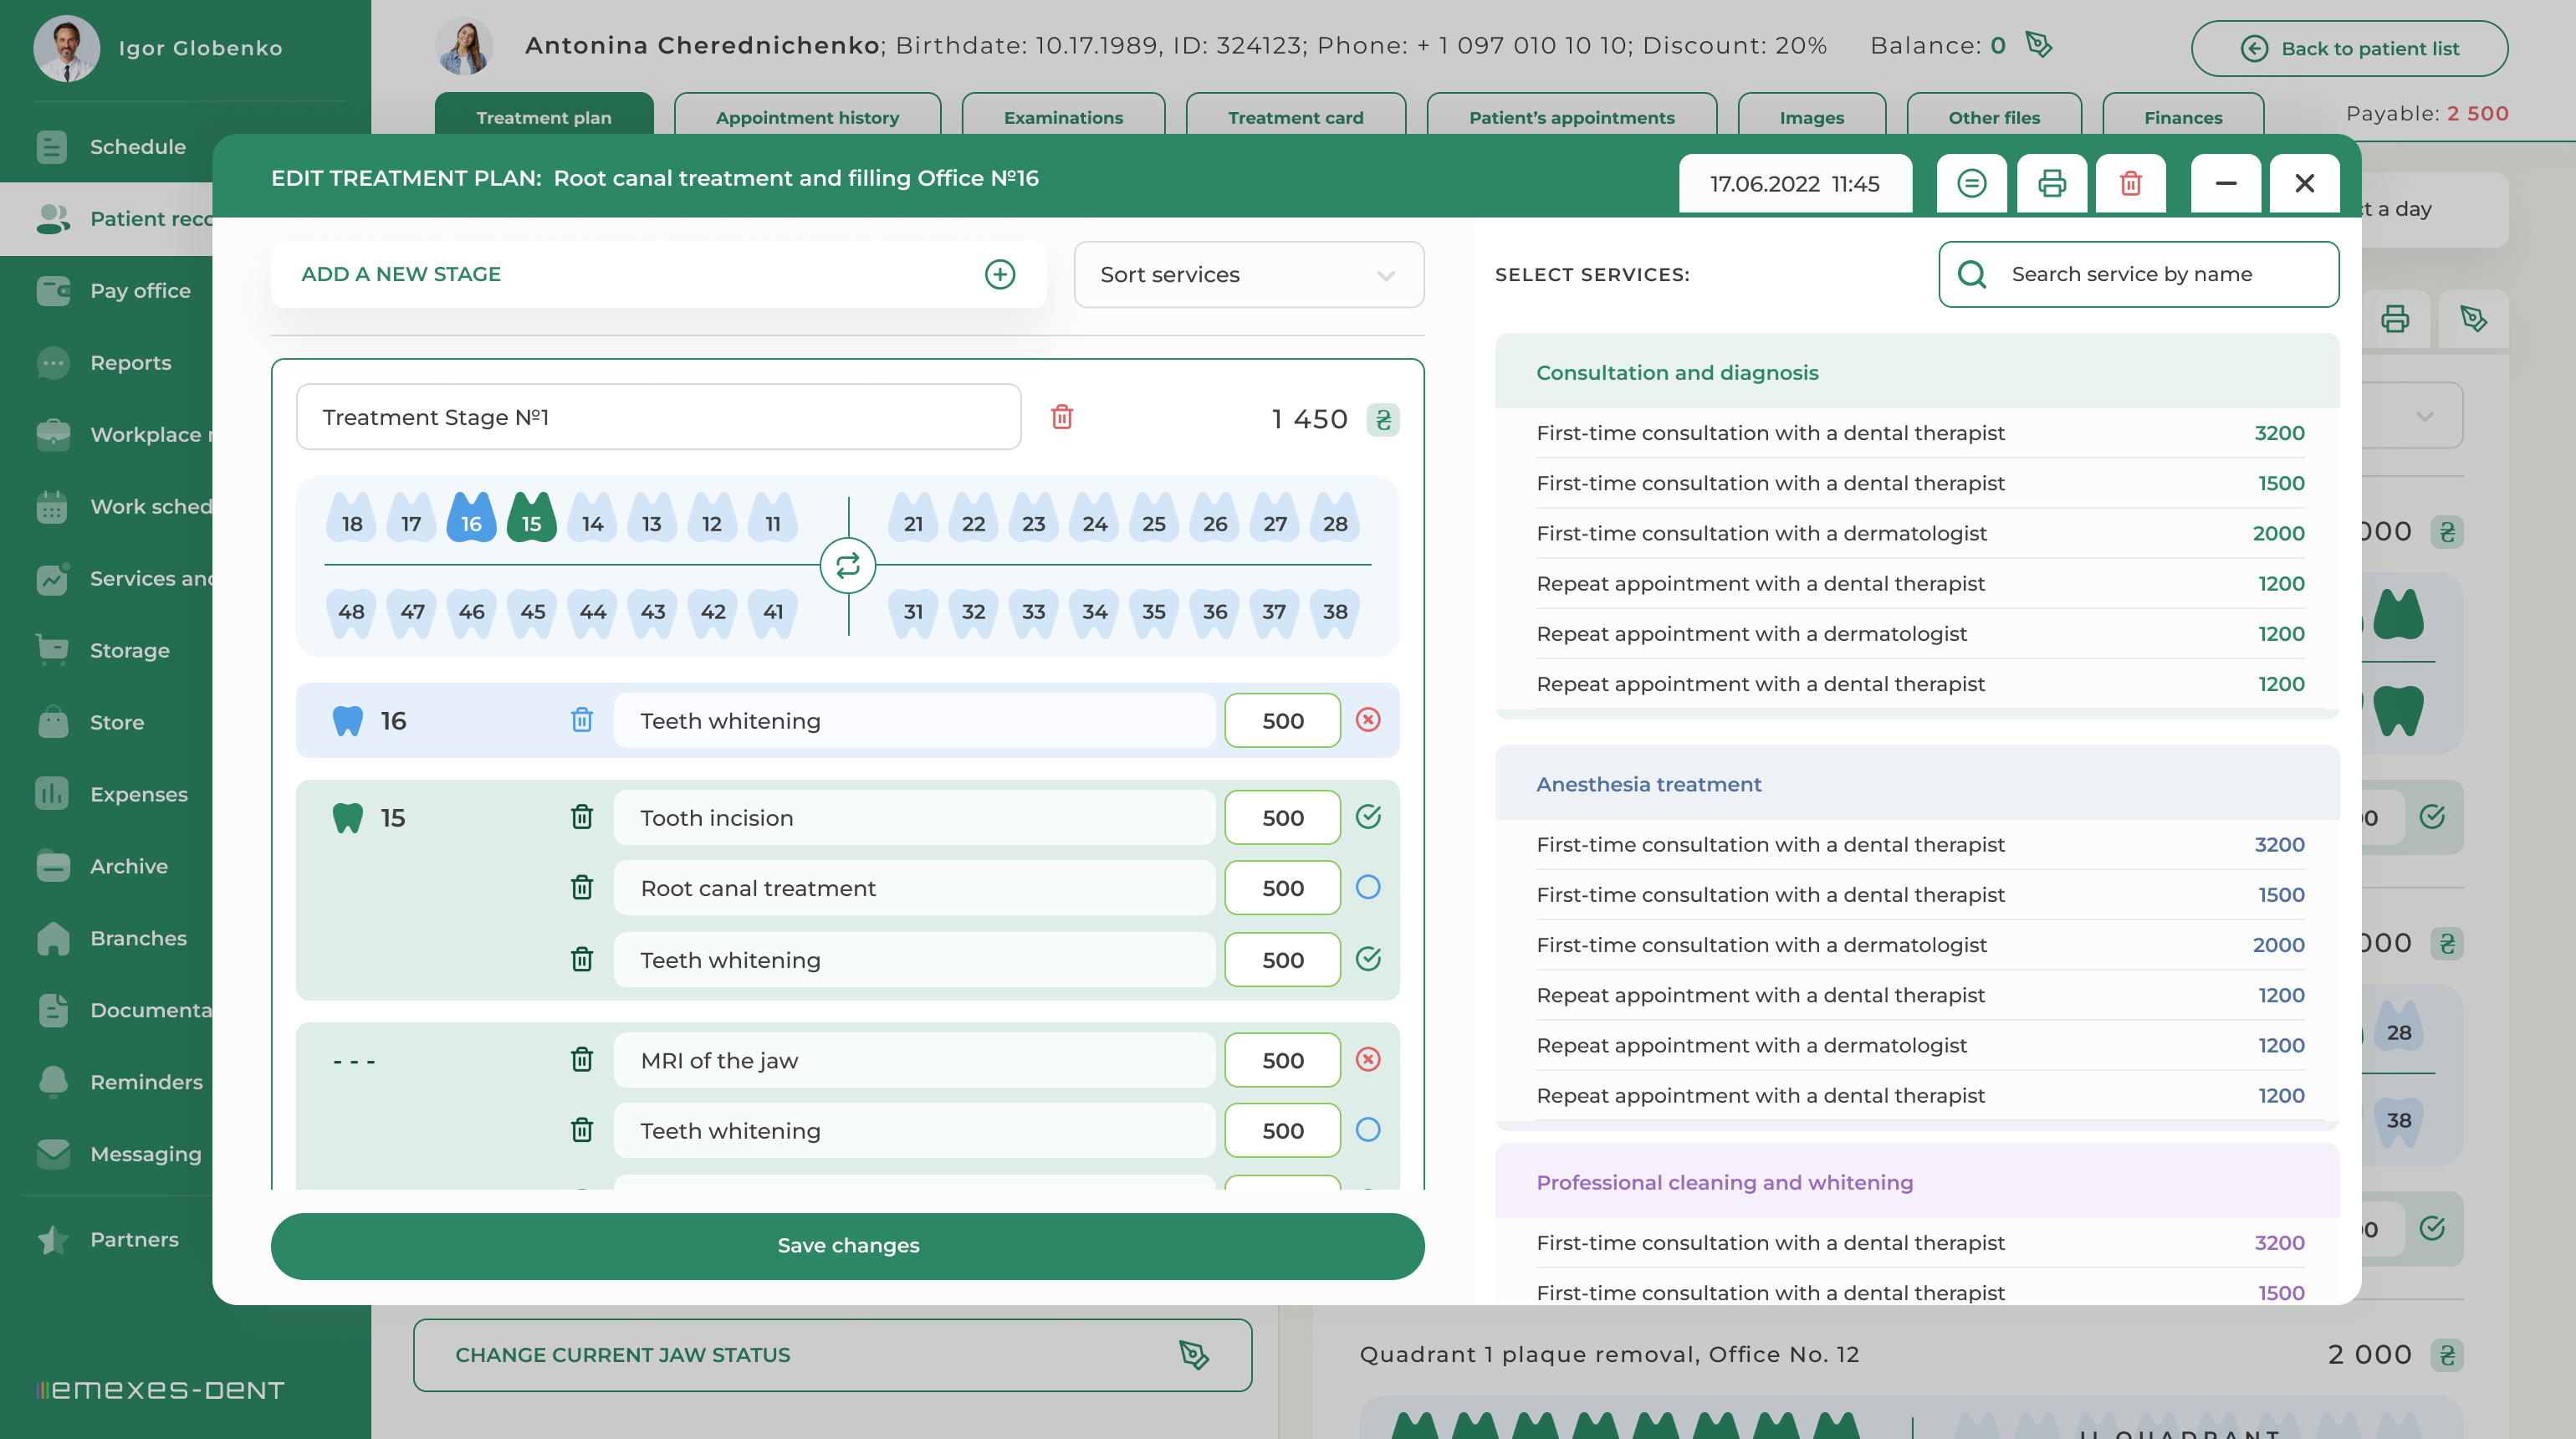
To edit the treatment plan, click on the corresponding icon in the upper right corner. Here you will be able to make changes to the treatment plan or delete it completely.
To edit a particular STEP in the treatment plan, you must first select it. Here you can also sort the display of services by status in order to print the treatment plan in the required form.
THE CURRENT STATUS OF THE PATIENT'S JAW is an important part of the "Treatment Plan" section, which actually displays all preliminary interventions, the condition of the teeth and the diagnoses made by the doctor when examining the patient. Jaw Map is a pop-up window that can be minimized.
1. JAW STATUS EDITING
The jaw status of a patient is initially displayed with a healthy parodentium and intact teeth. To make changes, click on the Edit Current Jaw Status button.
After that, a doctor and medical assistant can be assigned in the modal window. After saving the changes, the jaw status will be updated, and you can edit it any time according to its current condition.
The left half of the window contains the jaw map, and the right half contains the statuses that can be assigned to objects. The numbers of intact objects on the map on the left remain black until their status is changed, while those that have been corrected are displayed in blue. The status assigned to them are also displayed in blue, underlined text.
The procedure for changing the jaw status is as follows. You select an object on the left side of the window and assign a status to it on the right. Then select another object and repeat the procedure. If you want to assign the same status to multiple objects, you can select them with the Ctrl or Shift keys or use the "Select all" button.
The jaw chart provides for marking the status of the patient's fillings and crowns, except for temporary fillings. Red means that the filling is defective and green means that the filling is in good condition.
If you have mistakenly assigned this or that condition to a tooth, you can use the arrow button "Undo last action". Also available on the left side of the window is the "Reset" button, which returns to the original status of the jaw (at the time you started editing).
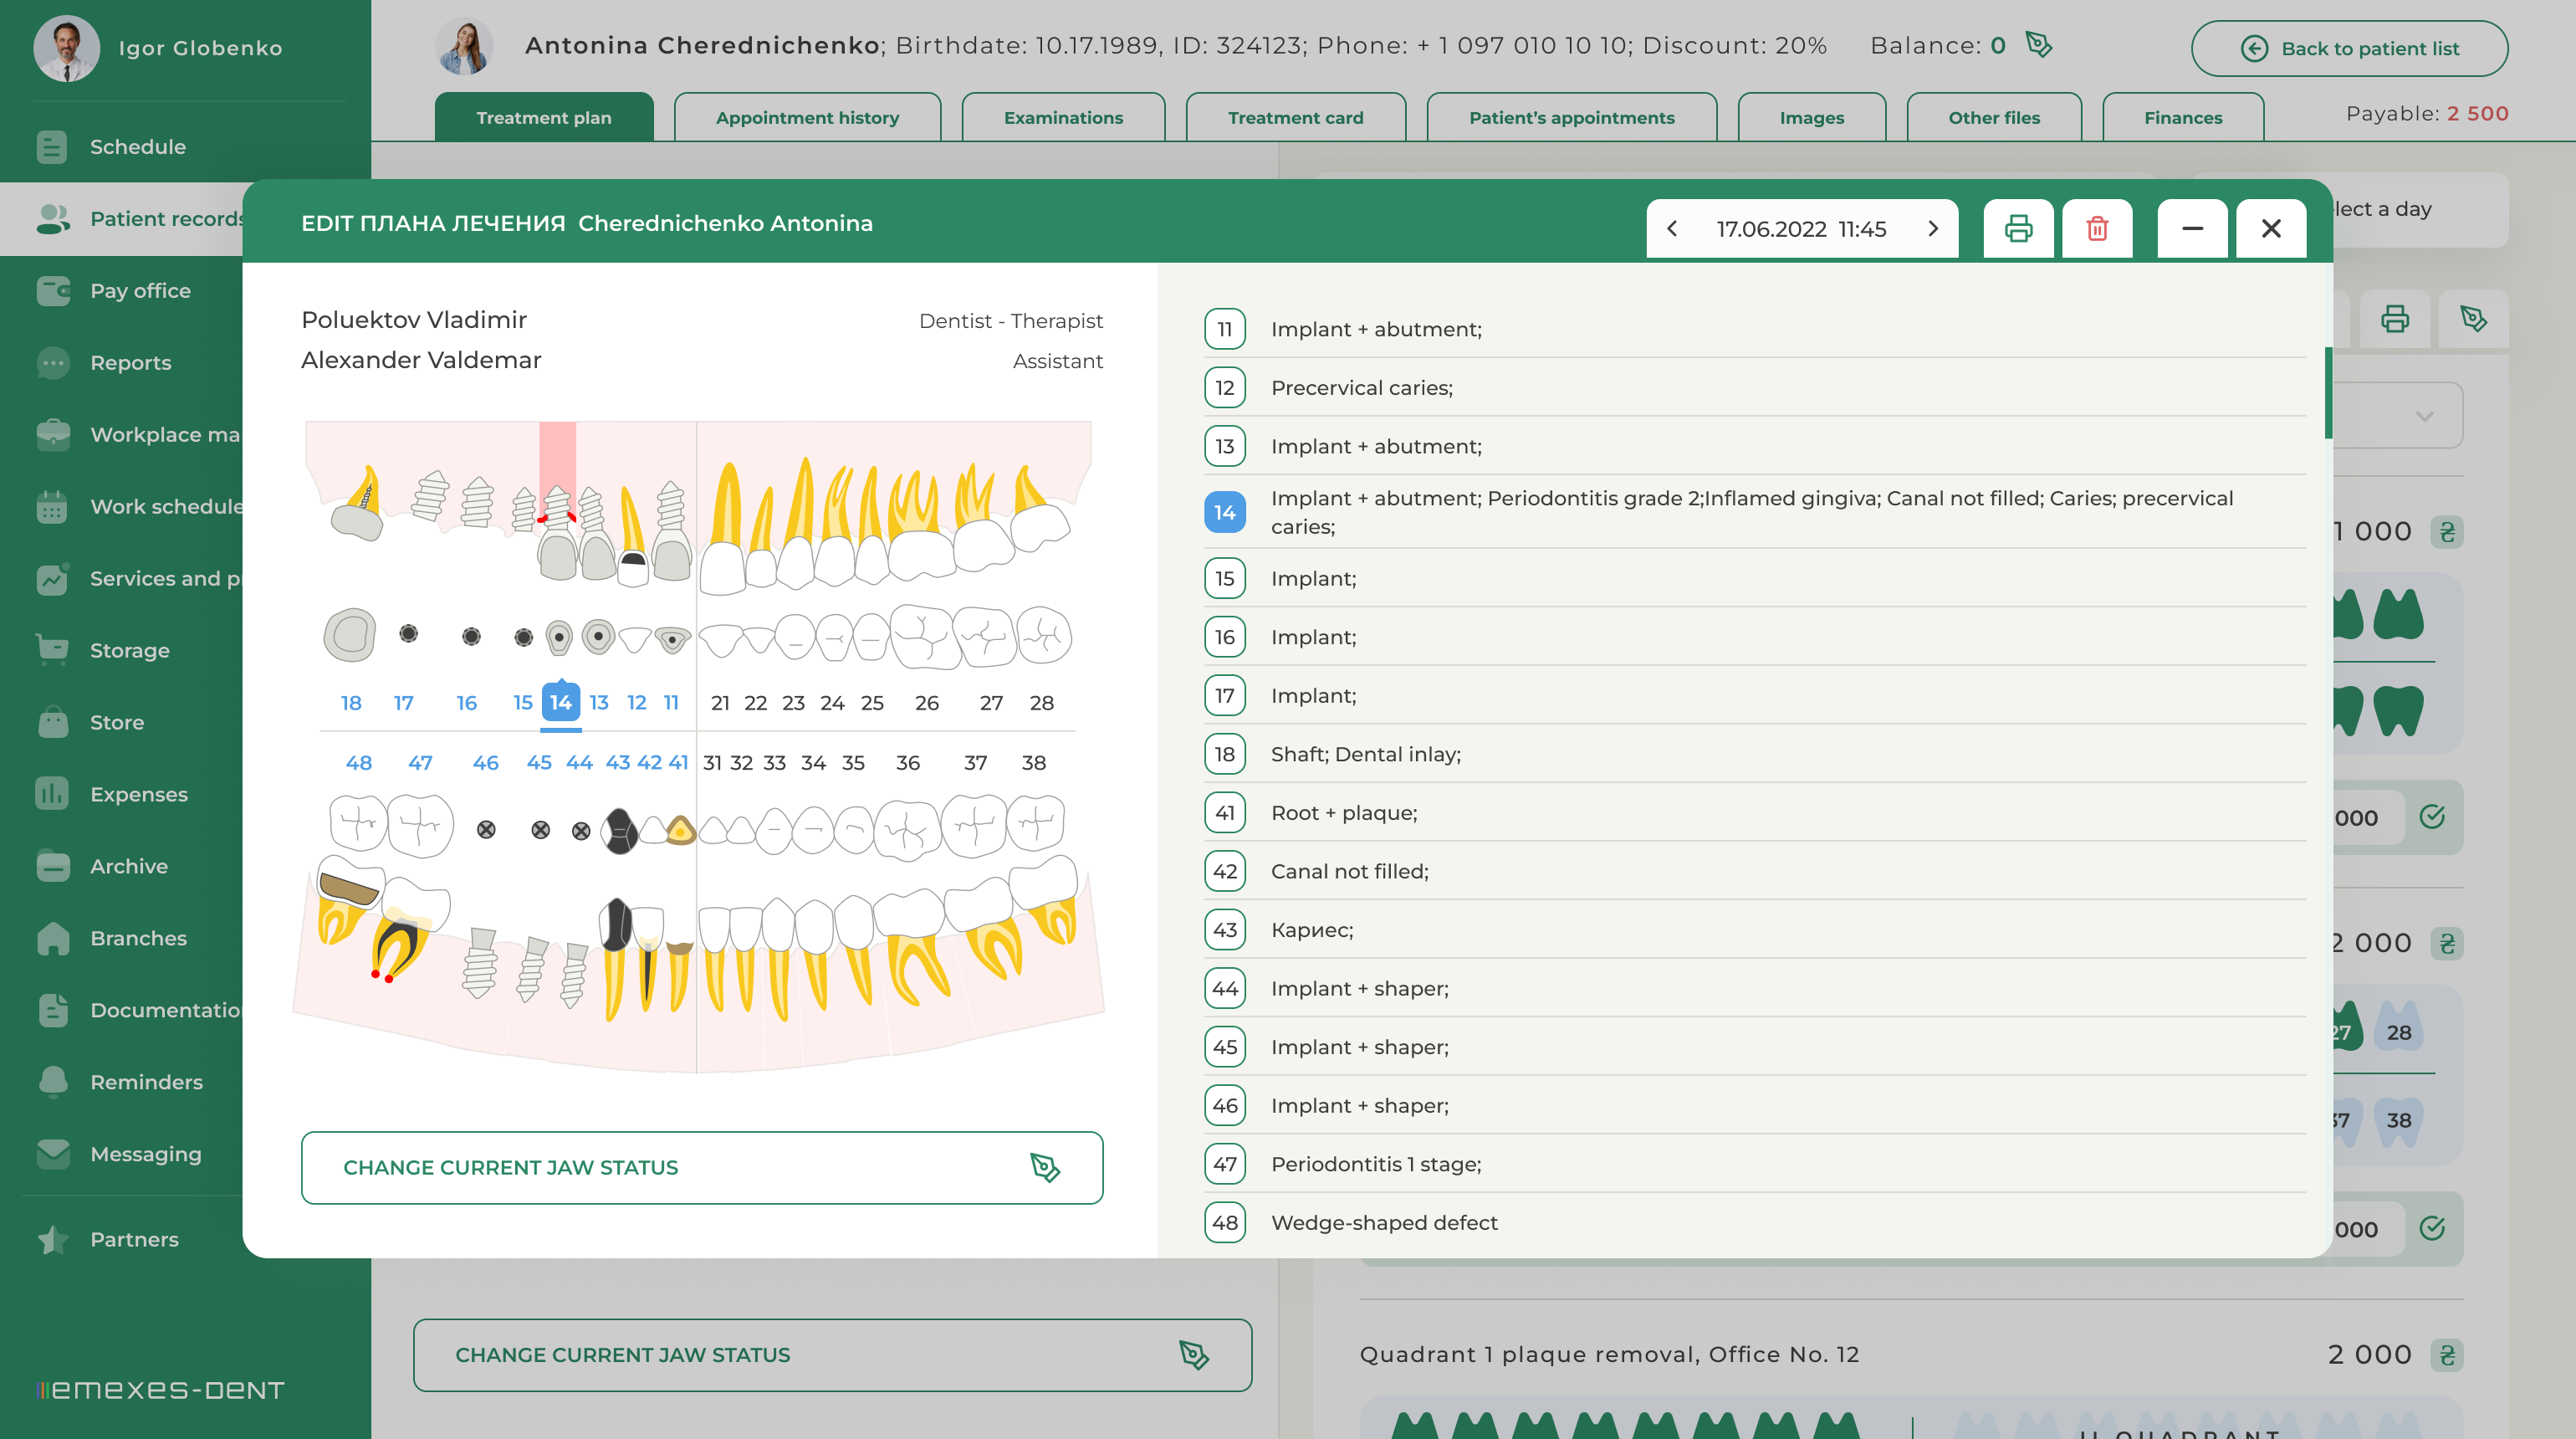
2. VIEWING THE PATIENT'S JAW STATUS
After saving the editing results, the jaw status will be archived. A detailed view of the jaw map will then be available. To do this, in the Treatment Plan tab, click on the jaw map and a viewing window will open with a description of the status of each tooth and a list of the authors of the edits. In this window, you can view the archive by toggling the previous statuses of the jaw using the arrows next to the edit date. You can also remove previous jaw statuses from the archive if you have authored them.


